Making Of

By Jeff Mottle

The Making of Siek Box House

Rio Febrian | 3D Artist | Denpasar, Indonesia

Hi all, thanks to the CGarchitect team for this great site and thank you for all who give comments, feedback and encouragement. In this article I will try to write the Making Of Siek Box House. This is my work for challenge the facebook group “3D Render Party”, and this box house is the 5th season of this group's challenges. The building model was provided by Arya Siek (the organizer/administrator of this group/challenge).


CONCEPT AND WORKFLOW

I believe that the preparation and planning step is very important in every visualization project. I was imagining which environment would be good for this box house. I had a simple picture in my mind about a silent river beside the house, with many stones on the river. I used Linear Workflow for gamma setting in my scene, and I turned the gamma to 2.2.

MODELING

As I mentioned before, this model was provided by the organizer of this challenge. But I remodeled this whole part of the house because I wanted to put some details with chamfered edges on every corner edge. I believe in reality most of the corner edges around us are chamfered, not sharp like a knife. I also made some details like screw heads on the railing.

TEXTURING

Most of the textures that needed dirt, like the concrete wall, the window frame, railing, back-wall panel, pool andconcrete, used the VrayBlendMaterial. I used VRayDirt for the 1st and 2nd blend amount. But you have to swap occluded color and unoccluded color in it. One of the V-Ray dirt is normal, and the other one is invert normal, to put the dirt on both directions of corner (inside and outside). The last blend amount is for the leaking part at the bottom of the wall, I used a leaking texture from www.cgtextures.com. Many of textures in this scene came from there. Here are my material setting for concrete wall:

I needed to put different map channels for the dirt, so here are my UV mapping for the wall:

I used the same method for the railings, pool concrete, window frame and back panels textures.

Here is the ground material where I applied the VrayDisplacement modifier:

LIGHTING AND GI

In this scene I only used VRay Sun for the lighting. To get this kind of dusk mood, I put the sun at a very low angle and I increased the size multiplier to get blurred shadows.
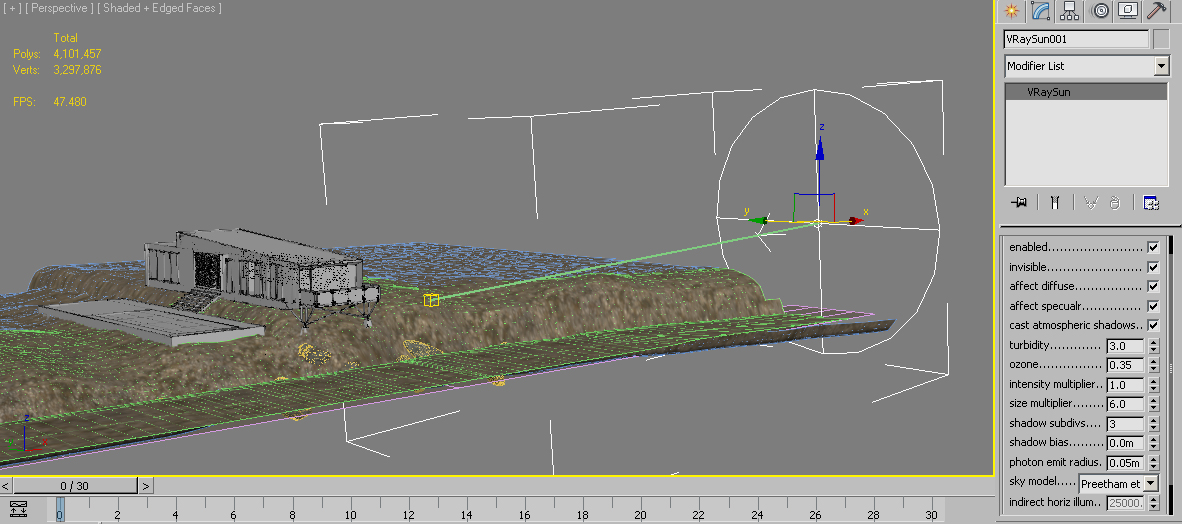
Next, we have to define the environment background and GI. I used two slots for the material, one of them for the background, and one for lighting (GI). Both were made the same, but just in case I needed to make some changes, I made them in separate slots. For the environment background and GI, I used a mix of material between VraySky and Bitmap. The bitmap is a 360° sky bitmap that I downloaded from www.cgtextures.com, I choose the dusk one. I did many tests for this to define the mix amount (which one is better, close to the VraySky or close to the bitmap sky). In the bitmap, I also brought the RGB levels up to get the right level. Here is the mix:

GRASS, PLANTS AND SCATTERING

I used models from iTree and Evermotion for the trees in this scene and of course I proxied them. For the grass I used models from iGrass, and then I scattered them using multiscatter and multipainter. I also painted some gravel on the ground. Here you can see the scatters I used:

Main grass:


Field big-grass:


Galium plants:


Gravel (I used the asteroid generator script to create many different shapes of stones):

RENDERING

I rendered this scene with V-Ray, my favorite render engine. Here are the render settings:

THE POST-PRODUCTION

In this post-production step, I used Photoshop and MagicBullet PhotoLooks. Actually this is not a heavy post production. I only did color corrections, added contrast, glow and fixed the saturation on grass. Here are the layer/steps:

Original render

Darker water and stones

Color correction and add contrast

Color correction and sharpening

More sharpening on the gravel and stones area

Reduce grass saturation

More contrast and sharpening on the left/foreground tree

Adding sky glow

Adding a little bit fog using Z-depth

Add darker part at the bottom of the stones:

As you can see, the post production for this scene is not complicated, it is only about adding contrast, color correction, and adding fog and glow. But the most important thing is to think creatively when we compose the image.

Here are the wireframes for every single view that I posted before:

Well, I hope you enjoyed this article, and may it help you in some way. Please feel free to ask if there are any questions.

You must be logged in to post a comment. Login here.
BRO I JUST LEARN SOMETHING FROM U, BUT I CANT GET THE SUNLIGHT SETTINGS . IF CAN COULD U PLZ SEND THE 3DS MAX FILE. I JUST WANT THE SUN SETTINGS WITH V RAY SUN . I DUN WANT THE MATERIALS ALL.. CAN U PLZ .TQ BRO
Excellent work! Great tutorials. very informative. I learned something new by reading your tutorial. Thanks my friend. God Bless you!
Great tutorial, i got only a few questions.. i cannot get my water right.? some tips mayb? and how do you extract the Render out of max, in layers in photoshop? It would be a great help cheers
Superb project, and I learnt a lot from reading it. I have one criticism if I may, concrete stains down from the roof edge, not up from the ground, in my experience. Stains from concrete, render, and the like are all caused by regular run marks from rainwater - so you tend to get them particularly from badly constructed cills which don't have sufficient overhang, and sometimes from roofs which also dont have much of an overhang. The only staining you might get from the base of the wall would tend to be a little moss growth where the water seeps up the outside of the concrete a little bit if the concrete is slightly porous. Anyway otherwise it is truly excellent.
Thanks a lot for your critics, I think you are also right about that stains on the concrete. The main stains comes from the top, and the moss comes from bottom. Thanks again bro, I will noted that for my next works :)
Excellent work! Could tell us how long did it take to render and the specs of your computer, just to have an idea. Thanks.
It was approximately 2 hours per image. I use i7 2600k.
Great read, and as you know by now great work. Thanks for sharing. I think you really hit the nail on the head when you said "the most important thing is to think creatively when we compose the image.". When its so easy to get caught up in the texturing, rendering and post production. We have to remember that its the composition that is vitally important, none of that matters if its chosen poorly. its all to easy to forget that, or just miss the mark (myself often included). Great job sir. And thanks again.
Right, I agree with you, Curtis. Sometimes is hard to find a good composition and angle :D Thanks Curtis :)
Ferry Sugianto & Robby Cahyadi: thanks bro!
it was a nice experience to read your tutorial especially the lighting and the shading part was really amazing learned a lot from you thanks for sharing :) makasih :)
Thank you Muneer, makasih sama2 :)
look so nice!!
I was curious if you could go into more detail about the "bloom" effect you added? It looks like you changed the levels of a masked copy or something, then applied the hue/sat and exposure adj layers? How exactly did you do it?
Hi d wid, I used a plugin for photoshop called magic bullet PhotoLooks. There is a tool called "diffusion" to make a bloom/glow on the very-bright area. And we can color that diffusion also :)
Superb project, and I learnt a lot from reading it. I have one criticism if I may, concrete stains down from the roof edge, not up from the ground, in my experience. Stains from concrete, render, and the like are all caused by regular run marks from rainwater - so you tend to get them particularly from badly constructed cills which don't have sufficient overhang, and sometimes from roofs which also dont have much of an overhang. The only staining you might get from the base of the wall would tend to be a little moss growth where the water seeps up the outside of the concrete a little bit if the concrete is slightly porous. Anyway otherwise it is truly excellent.
Excellent work! Could tell us how long did it take to render and the specs of your computer, just to have an idea. Thanks.
Great read, and as you know by now great work. Thanks for sharing. I think you really hit the nail on the head when you said "the most important thing is to think creatively when we compose the image.". When its so easy to get caught up in the texturing, rendering and post production. We have to remember that its the composition that is vitally important, none of that matters if its chosen poorly. its all to easy to forget that, or just miss the mark (myself often included). Great job sir. And thanks again.
Amazing work dude.... Hidup Indonesia!! >.<
superrrr
it was a nice experience to read your tutorial especially the lighting and the shading part was really amazing learned a lot from you thanks for sharing :) makasih :)
d
I was curious if you could go into more detail about the "bloom" effect you added? It looks like you changed the levels of a masked copy or something, then applied the hue/sat and exposure adj layers? How exactly did you do it?
Hi Phill, Thank you for your appreciation. I think we have to have a good graphic card to deal with high poly count, to make our viewport not heavy.
Hi Rio, Great work really nice. How did you deal with the large poly count from the house model and then the additional poly count from the environment and vegetation. Is it a case or more ram or do you have a neat tricks and suggestions? Regards PH

About this article

Indonesia's Rio Febrian provides an exclusive detailed breakdown of his Siek Box House scene.

visibility80.5 k
favorite_border99
mode_comment98
Report Abuse

About the author

Jeff Mottle

Founder at CGarchitect

placeCalgary, CA